One of the most often used methods for troubleshooting Windows issues is Safe Mode. We have gathered several launch alternatives, both easy and difficult, in this content. Windows 10 Safe Mode
Starting Safe Mode from a Running Operating System
First way

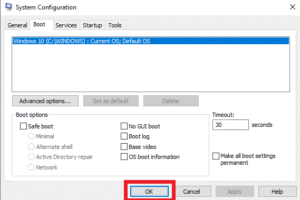
- Press the Win + R key combination. In the Run window that appears, enter the msconfig command and click OK. Find the “Boot” tab and check the box next to “Safe Mode”;
- Click “OK”, then “Reboot”. After reboot, Windows 10 will start in safe mode. You will have to disable it manually – repeat the steps from the previous paragraph, but uncheck the box.
Second way

- Right-click on the Start menu, select Settings, then Update and Security. Next, go to “Recovery” and click “Restart now”;
- On the “Select Action” screen, click “Troubleshooting”. Next, select “Advanced options”, then “Boot options” and “Restart”;
- We find ourselves in a menu where there are three options for starting safe mode to choose from. To start standard safe mode, press F4. If you need safe mode with network support, then F5. F6 is responsible for activating safe mode with command line support;
- Windows 10 will reboot and start in Safe Mode.
Starting safe mode when the operating system is not running
First way

Here, you’ll need a Windows 10 installation DVD to start safe mode. Take a flash drive containing the system installer, for instance. Additionally, find out which key on your laptop or PC activates the BIOS first. This is typically F2, F9, or Del, but it may vary.
- Connect the Windows 10 media to your PC or laptop. Then turn on the device and enter the BIOS;
- Select the connected media to launch. Click “Next”, then “System Restore” – we get to the “Select an action” screen. Go to the “Troubleshooting” menu;
- Click “Command Prompt” and enter one of the following commands in the window that appears: bcdedit /set {default} safeboot minimal (enabling safe mode) or bcdedit /set {default} safeboot network (enabling safe mode with network support);
- Having decided on the desired option, press Enter and close the command line. On the “Select action” screen, click “Turn off computer”;
- After turning on the device, Windows will start in safe mode. You will have to disable it manually.
Method one
- Press the Win + R key combination and enter the msconfig command in the “Run” window, then click “OK”;
- Go to the “Boot” tab and uncheck the box next to “Safe Mode”.
Method two
- Run Command Prompt (cmd) as administrator. Enter the command bcdedit /deletevalue {default} safeboot;
- Next, press Enter, close the command prompt and reboot the system. Windows 10 will start normally.
Second way

A method for those who do not have Windows 10 media.
Procedure:
- Forcefully turn off the device by holding the power button for a few seconds. After that, start the PC or laptop and turn it off again. You need to do this three times for automatic system recovery to start;
- On the screen that appears, click “Advanced options”, then “Troubleshooting”. Next, select “Advanced options”, then “Boot options” and “Restart”.
We get to a menu where three options for starting safe mode are offered. Select the one you need by pressing F4, F5 or F6. Windows 10 will reboot and start in Safe Mode.
Also Read: How to partition a hard drive in Windows 10


