Windows has a plethora of customizable settings, particularly in versions 7 and 10. You may add your icons to shortcuts, change the system colors, install a variety of eye-catching and colorful widgets, and set backgrounds, including live ones. How to change font on PC and laptop
However, how about altering the font? Segoe UI is Windows’ default font. Read our post to discover the system’s secrets and how to install another one.
Via Registry Editor
Anyone who has ever attempted to make changes to their PC, such as uninstalling a built-in program, is familiar with the Windows Registry Editor. To use it and modify the font, adhere to these guidelines:
- Using Win+R, launch the Run window and type regedit in it to open the Registry Editor;
- Go to the path HKEY_LOCAL_MACHINE/SOFTWARE/Microsoft/Windows NT/CurrentVersion and find the Fonts item there;
- Remove values from fonts that match Segoe UI, leaving only Emoji;

- Go to the FontSubstitutes registry key;
- Create a new setting and call it Segoe UI;
- In the “values” line of this parameter, enter the name of the font that you want to set as standard;
- Apply the changes and restart your PC.
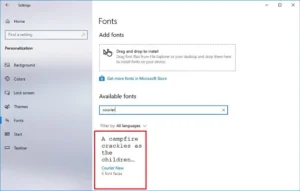
The “Fonts” directory in your PC’s settings has the font name that you like. If you open the font file, you may examine every character in greater depth. Additionally, try writing anything in Microsoft Office and specifying the desired style to see how the entire phrase will appear.
The most important thing to keep in mind is that not all system versions support changing the font via the registry. Use third-party apps if your registry lacks a font file.
Through third party programs
Third-party programs are another great way that you can both change the font on your computer and return the settings to default. Below we will look at three convenient utilities that will help with this.
Winaero Tweaker
The developer’s official website offers a free download of the program. The application is updated frequently, and it now works with Windows 11. We may include its extensive capability, easy-to-use interface, and modest disk space requirements as some of its benefits.
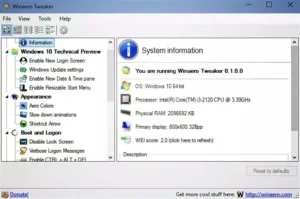
To change the font through the program, you need:
- Launch the program and enable advanced settings;
- Click Change font and select the font you are interested in;
- Set the style, style and size of characters for the selected font;
- Save changes and restart your PC.
You can cancel all changes using the Reset button in the main menu of the program. After this, all changes will return to the system settings. This way you can experiment and find the best font for yourself.
Advanced System Font Changer
Another way to change the font on your PC is the Advanced System Font Changer program. You can download it for free . Its interface is even simpler, because on the main screen you will immediately receive information about which system components use fonts and change their settings.
It’s easy to do:
- Select the components whose fonts you want to change (headers, menus, statuses, etc.);
- Change the text options;
- Apply the changes and check the results.
As in the previous utility, you can also cancel all changes if they do not suit you. To do this, go into the program again and click on the Default button.
System Font Size Changer
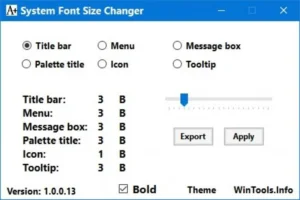
As the name suggests, this utility works mainly with text size. But it is also possible to change the font using it. The program works with Windows registry entries, changing them to apply settings. Distributed free of charge.
Before starting, the utility will prompt you to create and save a registry file with the current system parameters. If the changes do not suit you, you can always run the saved file and return everything as it was.

You can alter the font and text size used in many system components by using System Font Size Changer. To make the characters stand out, you can also make them bold in some parts. Titles, message boxes, tooltips, menus, and captions can all be altered.
Changing the font size
Let’s say you changed the font, but another problem appeared – it seems too small compared to the standard one. To fix this, you need to change the text display scale.
In Windows 10, you can change the font size separately from other elements. In this case, you don’t even need to install third-party programs; you can get by with the built-in functionality:
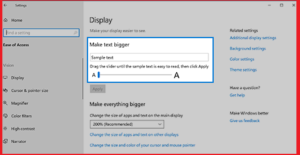
- Open “PC Settings” via “Start” or the Win + I combination;
- Go to the accessibility menu;
- Open the “Display” tab and set the text scale as a percentage;
- Apply the settings and check the font size in other windows;
- Change the scale if it doesn’t suit you.
You can also change the size of system elements, and the text on them will also change. To do this, in “PC Settings”, first go to “System”, and then open the “Display” item. There you need to find the scale and layout of the elements and set the size of each of them.
How to add a font
If you downloaded the font you like from the site, simply unpacking the archive will not be enough. For it to appear on the system, you need to install the file. There are two ways to do this.
First way
Unzip the files from the archive into a folder. You will see TrueType and OpenType files. Right-click on them and select Install. So the system will do everything for you.

Second way
Open the C:\Windows\Fonts folder and drag the font files from the unpacked archive there. You can check their functionality in a text editor.
And you can view all installed styles through the control panel. Go to the “Fonts” section and you will see all the files. You can click on each of them to view the symbols.
How to undo changes
If you don’t like the changes and want to return the system text settings, follow our instructions:
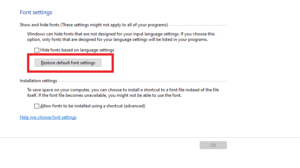
- Open the Fonts folder in Control Panel;
- Go to the settings section;
- Click on the button to restore text parameters.
After this, the system will again use Segoe UI for all text.
Now you don’t have to Google “how to change the font on a Windows 10 computer” and other queries. We described all the methods in the article, use them and customize the system for yourself.
Also Read: How to Use One WhatsApp Account on two Phones
Also Read: How to check USB Serial number in Computer (Window10)


